This weekend, I started constructing my HoverRoomba. After a trip to the orange home improvement store (about $4.50 for the 2'x4' sheet of MDF), here's what I did:
1. First, I cut the MDF down to 2'x2' (gives me spare wood to make another one if needed).
2. Next, I found the center of the 2'x2' sqaure using the corner technique.
3. I drove a small nail into the center of the circle and used some rope to draw a 13" circle (the Roomba is 13" in diameter.
4. Next, I sanded the edges to keep them from tearing the plastic sheeting.
5. After that, I drilled a small hole in what will be the rear of the craft. This is where I will be mounting the vacuum fan.
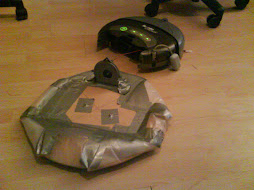
6. I had some heavy plastic sheeting left over from installing floating laminate flooring (the roll was about $18 originally, but I'm only using a small amount); this plastic was taped to the bottom with about 3/4" of "play" all around. This is the hovercraft skirt.
7. Next, I used some of the scrap MDF to finish the skirt and form the air pocket that the craft will hover on, I attached it with two wood screws.
8. I cut two vent holes in the skirt for the air to pass from the skirt to the coushin. When I first cut them, I made them too big (one of the pictures shows me testing the skirt by blowing through the hole). I covered them with tape and made smaller slits which seemed to work much better.
http://www.flickr.com/photos/27513500@N04/
All of the pictures were taken by my 10-year old with her phone (2.0 megapixel), so composition is what it is.
My next steps are to fit it to the Roomba and fine tune the shape. Then, I will hook the vacuum fan to it and see if she'll go.
Monday, June 9, 2008
Subscribe to:
Post Comments (Atom)
No comments:
Post a Comment